
I had just finished making my part art manifesto/part art therapy large scale double accordion book on sustaining my art practice when I saw that the fantastic printmaker John Pedder had announced a date for the next round of his simple instagram charity fundraising initiative #oneofmanypostcards I'd been thinking I would like to join in on the next round and so I set to making some mini versions of my big book.
To take part in this fundraiser you make a few of something then offer it up on instagram - maker pays the postage and the recipients make a donation to a charity of their choice for the amount they would have paid. I was a bit nervous in case nobody wanted them but I currently have 17 takers so I will need to do a draw to find the 'winners'.
I made a prototype/test first then made the other three simultaneously - there's something I really like about the production line feel when making multiples. There are quite a few stages in the making and I reckon it took me a good two days work to make them - I hope the winners appreciate this when they make their donations!
Here is how I made them. This isn't really a set of clear and helpful instructions - let me know in the comments if you are able to follow them though! If you want to make your own you might be better off to search 'double accordion book fold' on YouTube and find some proper instruction videos.

Each book needs 2 strips of paper 4 times as long as they are tall e.g. 10 x 40cm
Start by folding in half, half again, then each of the 4 squares you have made in half again to make 8 rectangles

To create the accordion you fold diagonals into each square. On one strip you do this to all 4 squares. On the other you need to leave a rectangle at each end and using the central 3 squares
Once all your folds are in you sort of poke the middle and can create the required concertina effect. It can be tricky to get started but is very satisfying once you get it.

Once all the folds were in place I started adding text. For these mini books I rubber stamped it. Somehow I only made one mistake! A bit of tippex mouse and you'd never have known!

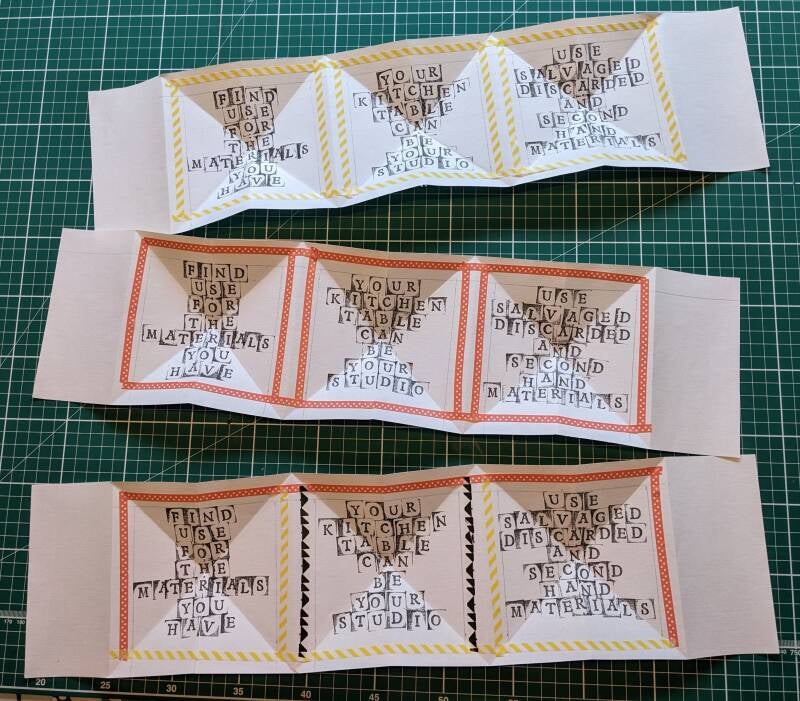
Then I added washi tape round the outside for decoration. I didn't have enough of any one style to do them all but followed my own instruction to 'use what 'I have@
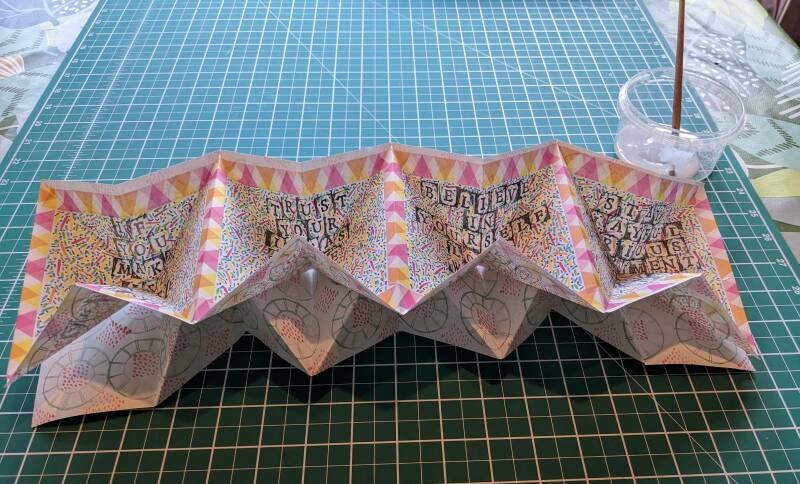
For some daft reason I used the same confetti background as for my larger piece. Filling 35 squares with this made my eyes sting!
On to the backgrounds. I found some rubber stamps that I could make patterns with and got stamping. This stage gave me a blister! I really have suffered for this project :-)

Really pleased with how the pattern came out though - even if it is a bit wonky.

Attaching the two halves. Make sure the outside is facing out and they are the right way up. Dabs of glue on each point and stick the end triangles of the strip of four on to the end rectangles of the strip of three.

I used gelliprinted sheets to make some cardboard covers. The covers are stuck on to the blank rectangles at either end of the strip of three squares.

And tadah! A little bit of ribbon added when you stick the covers on, a bead threaded through and you have a pretty little double folding book.
The great thing about this fold is that it can be looked at like an artists' book but also folded back on itself to become a hanging sculptural object. Click for a short video of the book gently swinging from it's thread.
Add comment
Comments